VxWorks 7自启动应用程序的四种方法
本文介绍了VxWorks 7系统下自启动应用程序的四种方法
背景介绍
在开始之前我们先来了解一下一些vxworks的一些基础知识。
VxWorks工程
VxWorks 7 可以创建以下几种典型的工程:
| Project Type | Output | Description |
|---|---|---|
| VSB (VxWorks Source Build) | .a | 基于某个特定的bsp,根据支持的cpu架构,把vxworks内核源码编译成静态库。注意这里这是只是把内核源码编译成库,供后续创建的VIP工程使用,并不会产生任何的映像文件。内核公共代码预先编译成库,也可以加速用户VIP工程的编译速度。另外也说明,如果你修改了内核代码,你需要重新编译VSB工程才会生效。 |
| VIP | (VxWorks Image Project) | vxworks 用户自定义的vxworks映像工程。把用户选择的各种内核组件(使用CDF文件描述),根据vxworks的启动顺序编译链接起来,得到常用的vxworks映像。各种内核组件在VSB工程中已经预先编译好,供VIP工程挑选使用。 |
| DKM (Downloadable Kernel Module) | .out | VxWorks内核态应用程序。可加载的内核模块,类似如linux下的ko文件。对于跑在内核态的用户代码,即可以添加到VIP工程中,也可以使用DKM工程独立成内核模块。在vxworks启动完成后,使用"ld < xxx.out"的命令来动态加载。 |
| RTP(Real-Time Process) | .vxe | VxWorks用户态应用程序。跑在用户态的用户代码,使用RTP工程编译成.vxe文件。在vxworks启动完成后,使用“rtp exec xxx.vxe”命令来执行。 |
VxWorks shell
VxWorks拥有自己的命令行交互工具kernel shell,比较特殊的是shell有两种模式分别支持两种解析器:C Interpreter和Command Interpreter。
| Mode | 提示符 | 模式切换 | Description |
|---|---|---|---|
| C Interpreter | -> | 使用“cmd”命令切换到Command Interpreter模式 | C Interpreter设计的目的是用来监控、调试内核代码。它最大的特点是可以直接调用函数名来执行,非常方便调试。 |
| Command Interpreter | # | 使用“C”命令切换到C Interpreter模式 | Command Interpreter设计的目的是用来启动、监控、调试用户态的RTP应用程序。它提供了很多专门的调试命令,类似于linux shell。 |
内核应用程序(DKM)自启动
需求来源
用户有两个内核应用程序,已经使用DKM工程编译成了.out文件:pruss_eth.out、s24_DriveRotationCiA402.out。在shell的C Interpreter模式下可以动态加载和运行:
step 1
手工加载pruss_eth.out,并调用prussStart()函数进行运行:
-> ld</mmc1:1/pruss_eth.out
value = 541560848 = 0x20479010
-> prussStart
init PRUSS2: physical memory 4B280000-4B2BFFFF
init PRUSS2: interrupts #186 #187
PRUSS2: Download firmware to PRU0
PRUSS2: Download firmware to PRU1
PRUSS2: start PRU0
PRUSS2: start PRU1
value = 0 = 0x0
step 2
手工加载s24_DriveRotationCiA402.out,并调用main()函数进行运行:
-> ld</mmc1:1/s24_DriveRotationCiA402.out
Warning: module 0x20479874 holds reference to undefined symbol EcatMasterServerStop.
Warning: module 0x20479874 holds reference to undefined symbol EcatMasterServerCreate.
Warning: module 0x20479874 holds reference to undefined symbol MasterStartPIClientProcessor.
Warning: module 0x20479874 holds reference to undefined symbol MasterStopPIClientProcessor.
Warning: module 0x20479874 holds reference to undefined symbol EcatMasterServerStart.
Warning: module 0x20479874 holds reference to undefined symbol EcatMasterServerDelete.
ld(): module contains undefined symbol(s) and may be unusable.
value = 0 = 0x0
-> main
 Initialize Master ...

 Create Master instance ...

 Get network adapter name ...
         Network adapters count:

 Attach Master to adapter 'kpa_pruss0' ...

 Create Configurator instance to load configuration ...

 Loading ENI '/master.xml' ...

 ...
用户希望在做硬件测试或者正式产品时,以上两步骤能够自动运行。
方案1(失败)
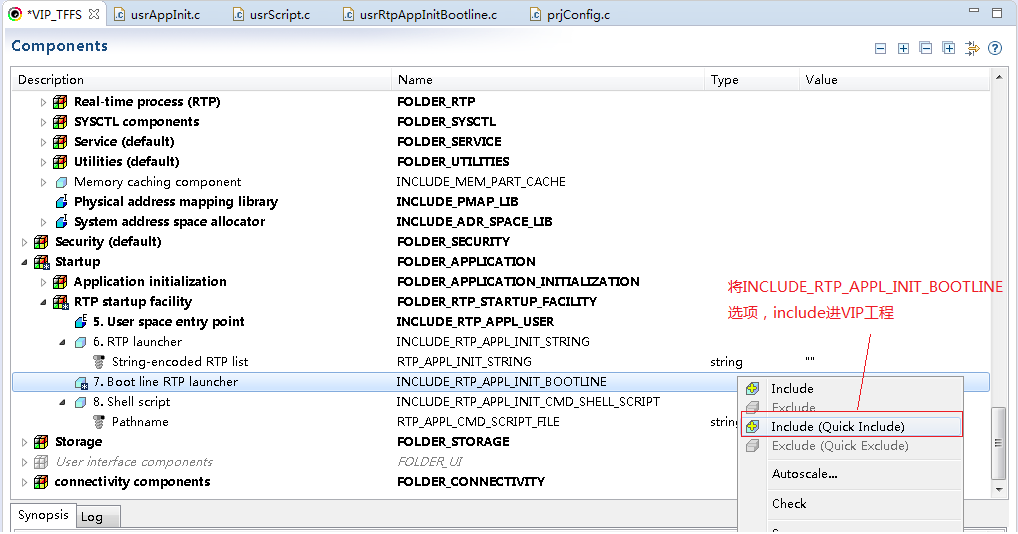
VxWorks支持使用INCLUDE_RTP_APPL_INIT_BOOTLINE组件来配置系统启动时自动运行C Interpreter格式的脚本,我们尝试使用此方法来实现系统启动时自加载DKM并运行。
-
首先我们在VIP工程的配置选项中,使能INCLUDE_RTP_APPL_INIT_BOOTLINE选项:
-
VIP工程的SCRIPT_DEFAULT选项设置为我们需要运行的脚本“/mmc1:1/autorun_c.sh”:
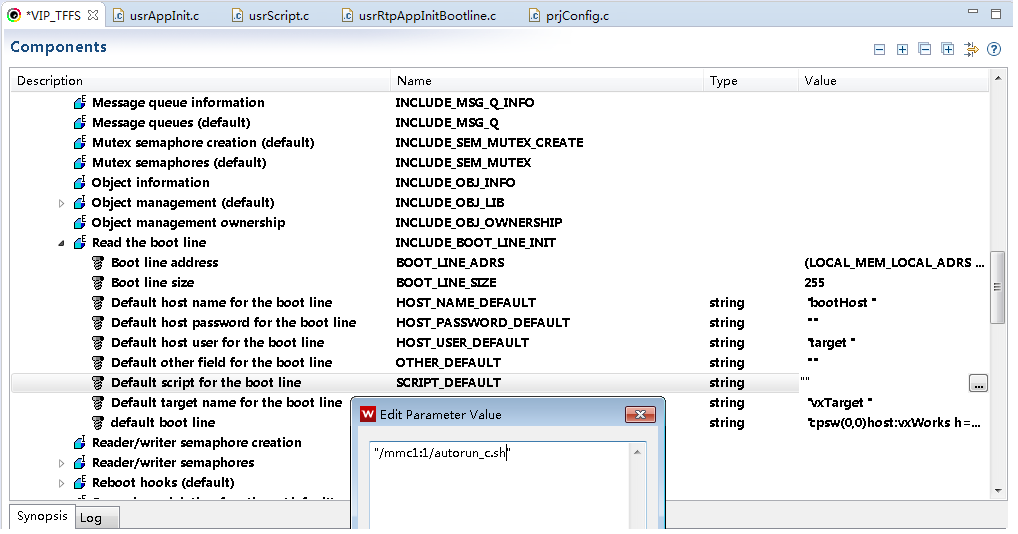
SCRIPT_DEFAULT主要的作用是设置default bootline中的startup script选项。vxworks在INCLUDE_RTP_APPL_INIT_BOOTLINE使能的情况下,会在启动阶段执行bootline中startup script选项描述的C脚本:
usrRoot() -> usrToolsInit() -> usrShellInit():

void usrShellInit (void)
    {
    shellLibInit ();                    /* This component includes the shell core files. */
    shellHistLibInit ();                /* This component provides the histSave() and histLoad() functions for the C interpreter. */
    dbgLibInit (DEBUG_STACK_TRACE_BUF_SIZE); /* This component includes the primary interactive functions for VxWorks. The following facilities are provided: task breakpoints, task single-stepping, symbolic disassembly, symbolic task stack tracing. */
    vxdbgRtpLibInit ();                 /* This component includes the process debugging library. */
    ledModeRegister (emacsLedLibInit);  /* This component provides an editing mode similar to the Emacs editor. */
    shellInterpRegister (shellInterpCInit); /* This component provides the C interpreter for the kernel shell. */
    shellInterpRegister (shellInterpCmdInit); /* This component provides the command interpreter for the kernel shell. */
    usrShellCmdInit ();                 /* The kernel shell commands initialization sequence */

	/* (1) 从bootline参数的startupScript选项中解析出脚本名,并执行 */
    usrStartupScript (startupScriptFieldSplit (sysBootParams.startupScript)); /* Including this component results in the execution of a kernel shell script at VxWorks startup. */
    usrShell ();                        /* This component includes the target-resident kernel shell, which is spawned as a task. Any function that is invoked from the kernel shell, rather than spawned, runs in the shell's context. The task name for a shell on the console is "tShell0". The kernel shell is re-entrant, and more than one shell task can run at a time (hence the number suffix). In addition, if a user logs in remotely (using rlogin or telnet) to a VxWorks target, the name reflects that fact as well. For example, "tShellRem1". The "tShell" basename is configurable, see the VxWorks 7 Kernel Shell User's Guide. */
    }
如果使用vxworks自带的bootloader,可以在boot cmd命令行中配置bootline的startup script选项:
startup script (s) : /mmc1:1/autorun_c.sh
但是我们目前方案的bootloader使用的是uboot,所有我们只需配置好默认bootline中的startup script选项。
- autorun_c.sh脚本中的内容非常简单,就是我们手工执行时需要键入的4条指令:
ld</mmc1:1/pruss_eth.out
prussStart
ld</mmc1:1/s24_DriveRotationCiA402.out
main
- 运行结果: 实际的运行结果,发现vxworks启动后,卡住几分钟才能执行到autorun_c.sh脚本:
 Adding 11197 symbols for standalone.   // vxworks启动完成


                                        // 卡住了好几分钟

Waiting for device to mount             // autorun_c.sh脚本才得到执行
Executing startup script '/mmc1:1/autorun_c.sh'...

ld</mmc1:1/pruss_eth.out
value = 541474832 = 0x20464010
prussStart
init PRUSS2: physical memory 4B280000-4B2BFFFF
init PRUSS2: interrupts #186 #187
PRUSS2: Download firmware to PRU0

...
- 初步分析卡住的原因:
在“usrRoot() -> usrToolsInit() -> usrShellInit()->usrStartupScript()”这个时间点执行“/mmc1:1/autorun_c.sh”脚本时,“/mmc1:1/”设备并没有mount好,usrStartupScript()函数中重试机制在不停的重新尝试执行,但是这个重试机制又会阻止“/mmc1:1/”的mount进程,所以会卡死很久。
因为没有深入研究vxworks的初始化流程,我们先尝试使用别的方法,后续有时间可以研究卡住问题的解决方案。
方案2(成功)
VxWorks执行自定义内核程序,还有一个公共的入口在usrAppInit()函数当中,函数调用关系如下:
void usrRoot (char *pMemPoolStart, unsigned memPoolSize)
{
    ...

    usrToolsInit ();    // 这里进行usrShellInit()->usrStartupScript()的调用
    usrAppInit ();

    ...
}
可以看到usrAppInit()调用点比方案1的usrShellInit()调用点靠后,我们尝试在usrAppInit()里面实现内核模块DKM的自加载。
- 我们在usrAppInit()函数中直接调用usrStartupScript()来运行"/mmc1:1/autorun_c.sh"脚本:
void usrAppInit (void)
    {
#ifdef	USER_APPL_INIT
	USER_APPL_INIT;		/* for backwards compatibility */
#endif

    /* TODO: add application specific code here */

	ioDefPathSet("/mmc1:1/");

	usrStartupScript("/mmc1:1/autorun_c.sh");
    }
- autorun_c.sh脚本的内容还是和方案1一样:
ld</mmc1:1/pruss_eth.out
prussStart
ld</mmc1:1/s24_DriveRotationCiA402.out
main
- 运行结果:
vxworks启动后,没有卡住的现象,autorun_c.sh脚本能迅速得到执行:
 Adding 11197 symbols for standalone.

Waiting for device to mount
.->
Executing startup script '/mmc1:1/autorun_c.sh'...

ld</mmc1:1/pruss_eth.out
value = 541536272 = 0x20473010
prussStart
init PRUSS2: physical memory 4B280000-4B2BFFFF
init PRUSS2: interrupts #186 #187
PRUSS2: Download firmware to PRU0
PRUSS2: Download firmware to PRU1
PRUSS2: start PRU0
PRUSS2: start PRU1
value = 0 = 0x0
ld</mmc1:1/s24_DriveRotationCiA402.out
Warning: module 0x204735b8 holds reference to undefined symbol EcatMasterServerStop.
Warning: module 0x204735b8 holds reference to undefined symbol EcatMasterServerCreate.
Warning: module 0x204735b8 holds reference to undefined symbol MasterStartPIClientProcessor.
Warning: module 0x204735b8 holds reference to undefined symbol MasterStopPIClientProcessor.
Warning: module 0x204735b8 holds reference to undefined symbol EcatMasterServerStart.
Warning: module 0x204735b8 holds reference to undefined symbol EcatMasterServerDelete.
ld(): module contains undefined symbol(s) and may be unusable.
value = 0 = 0x0

Done executing startup script '/mmc1:1/autorun_c.sh'.

->
但细心的同学会发现autorun_c.sh脚本中的4条指令只执行了3条,最后一条"main"指令并没有得到执行,但是在shell下手工键入又可以得到执行,这是为什么呢?
首先怀疑"main"这个符号和其他人重名,造成调用失败。但是查找符号表后,发现并没有重名情况:
->
-> cmd
[vxWorks *]#
[vxWorks *]# lookup main
ipnet_radvd_main          0x001b8988 text
main                      0x00c9976c text     (s24_DriveRotationCiA402.out)
ipftpc_cmd_main           0x001325bc text
vxbClkDomainInit          0x003d5c00 text
tiClkDomainDrv            0x004cf6fc data
vxbClkDomainRegister      0x003d4af8 text
ipnet_flow_spec_domain    0x0015bc78 text
ipftps_main               0x001374a8 text
__dataset__driver_tiClkDomainDrv 0x004ddaa4 data
[vxWorks *]#
进一步分析运行log发现一个情况:同样是加载.out文件,“ld</mmc1:1/pruss_eth.out”的返回值0x20473010其实是pruss_eth.out加载后的MODULE ID,但是"ld</mmc1:1/s24_DriveRotationCiA402.out"的返回值却为0:
-> cmd
[vxWorks *]# module

MODULE NAME     MODULE ID  GROUP #    TEXT START DATA START  BSS START
--------------- ---------- ---------- ---------- ---------- ----------
pruss_eth.out   0x20473010          1 0x00b59010 0x00b5b0e4 NO SEGMENT
s24_DriveRotati 0x20473874          2 0x00b5c010 0x00cade18 0x00cb4064
于是怀疑"ld</mmc1:1/s24_DriveRotationCiA402.out"的加载过程出错,autorun_c.sh脚本执行中断,造成了随后的"main"命令没有得到运行。 在"ld</mmc1:1/s24_DriveRotationCiA402.out"我们可以看到有几个人符号没有得到解析的告警,虽然module还是加载上了还能手工执行,但是这个出错可能会中断脚本的运行:
...
Warning: module 0x204735b8 holds reference to undefined symbol EcatMasterServerStart.
Warning: module 0x204735b8 holds reference to undefined symbol EcatMasterServerDelete.
ld(): module contains undefined symbol(s) and may be unusable.
沿着这个分析方向,让用户编译一份没有符号解析错误的.out文件进行测试。
- 没有符号解析错误的.out,运行结果:
用户编译了一份没有符号解析错误的newmaster.out,来替换之前出错的s24_DriveRotationCiA402.out。autorun_c.sh脚本中的4条指令能够完美的得到执行:
 Adding 11197 symbols for standalone.

Waiting for device to mount
.-> Instantiating /sd0:2 as rawFs,  device = 0x50001

Executing startup script '/mmc1:1/autorun_c.sh'...

ld</mmc1:1/pruss_eth.out
value = 541560848 = 0x20479010
prussStart
init PRUSS2: physical memory 4B280000-4B2BFFFF
init PRUSS2: interrupts #186 #187
PRUSS2: Download firmware to PRU0
PRUSS2: Download firmware to PRU1
PRUSS2: start PRU0
PRUSS2: start PRU1
value = 0 = 0x0
ld</mmc1:1/newmaster.out
value = 541562996 = 0x20479874 = 't'
main

 Initialize Master ...

 Create Master instance ...

 Get network adapter name ...
         Network adapters count:

 Attach Master to adapter 'kpa_pruss0' ...

 Create Configurator instance to load configuration ...

 Loading ENI '/master.xml' ...

 Starting Master ...
         Master started.

 Start EtherCAT frames exchange ...

 Requesting Operational Master state ...

 ...
用户应用程序(RTP)自启动
在文档"installDir\docs\vxworks-7-1.0.8.6\Core\vxworks_7_programmers_guide.pdf"的"Automatic Execution of RTP Applications"章节,对RTP自启动的几种方法有着详细的描述,感兴趣可以自行学习。
我们以vxsim架构下的一个RTP程序为例来详细介绍这些方法。
首先我们创建了基于vxsim架构的VSB、VIP工程,并且创建了一个测试使用的RTP工程。测试代码的内容很简单:
rtp.c:

#include <stdio.h>

int main (
    int	   argc,	/* number of arguments */
    char * argv[]	/* array of arguments */
    ) {
	int i = 0;

	printf("Hello World!\nFrom your RTP application...\nBy pwl.\n");

	while(i<3){
		i++;
		taskDelay(100);
		printf("%d ticks\n", i*100);
	}

    return 0;
}
我们使用这个RTP工程编译出TestSimRtp.vxe映像文件。
手工执行TestSimRtp.vxe文件有两种方式:
- 在C shell下执行:
->
-> rtpSp "host:D:/pwl_workspace/TestSimRtp.vxe"
value = 941088064 = 0x3817dd40 = '@'
-> Hello World!
From your RTP application...
By pwl.
100 ticks
200 ticks
300 ticks

->
- 在Command shell下执行:
->
-> cmd
[vxWorks *]# rtp exec host:D:/pwl_workspace/TestSimRtp.vxe
Launching process 'host:D:/pwl_workspace/TestSimRtp.vxe' ...
Process 'host:D:/pwl_workspace/TestSimRtp.vxe' (process Id = 0x38cfb358) launched.
Hello World!
From your RTP application...
By pwl.
100 ticks
200 ticks
300 ticks
[vxWorks *]#
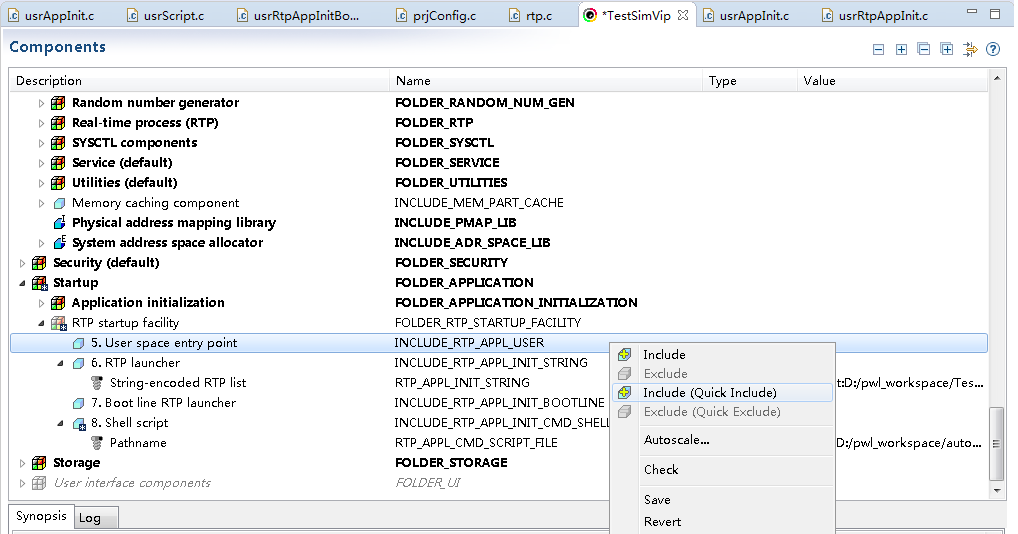
自动执行方式1 (RTP_APPL_INIT_STRING)
- 首先在vxsim的VIP工程中的配置选项中,使能INCLUDE_RTP_APPL_INIT_STRING选项:
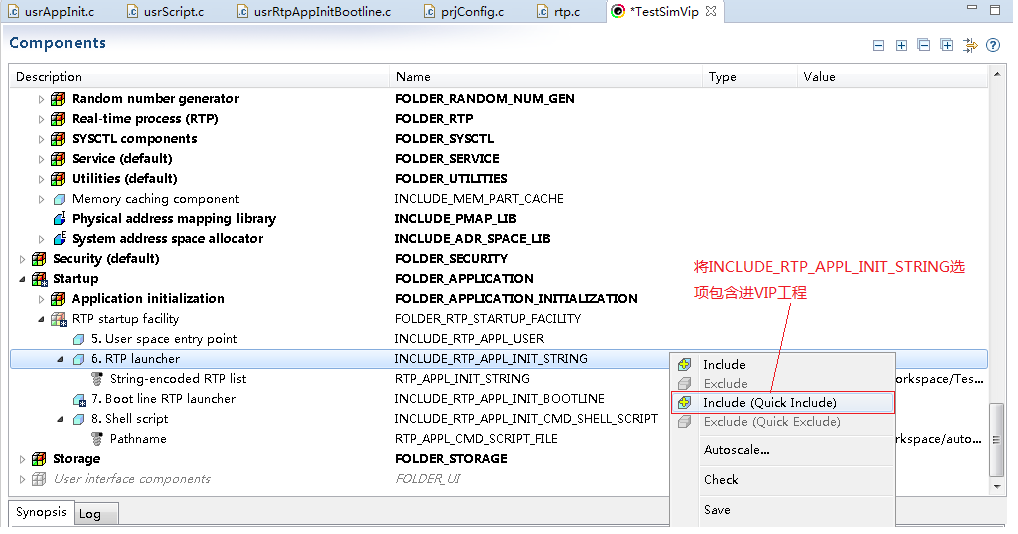
- 配置其中的RTP_APPL_INIT_STRING参数:
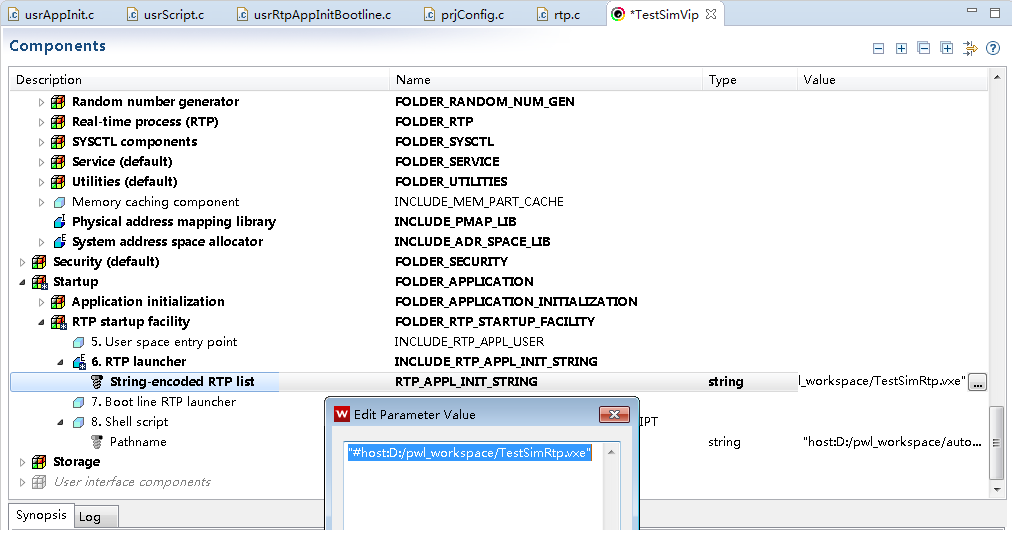 RTP_APPL_INIT_STRING参数的具体内容为:
"#host:D:/pwl_workspace/TestSimRtp.vxe"
- 启动vxworks simulator,查看运行结果,成功自动运行:
Loading symbol table from host:D:/pwl_workspace/TestSimVip/default/vxWorks.sym ...done

-> Spawning RTP: host:D:/pwl_workspace/TestSimRtp.vxe
Hello World!
From your RTP application...
By pwl.
100 ticks
200 ticks
300 ticks

->
自动执行方式2 (RTP_APPL_INIT_BOOTLINE)
VxWorks支持使用INCLUDE_RTP_APPL_INIT_BOOTLINE组件来配置系统启动时自动运行C Interpreter格式的脚本,我们尝试使用此方法来实现系统启动时自动运行RTP程序。
-
首先我们在vxsim VIP工程的配置选项中,使能INCLUDE_RTP_APPL_INIT_BOOTLINE选项:
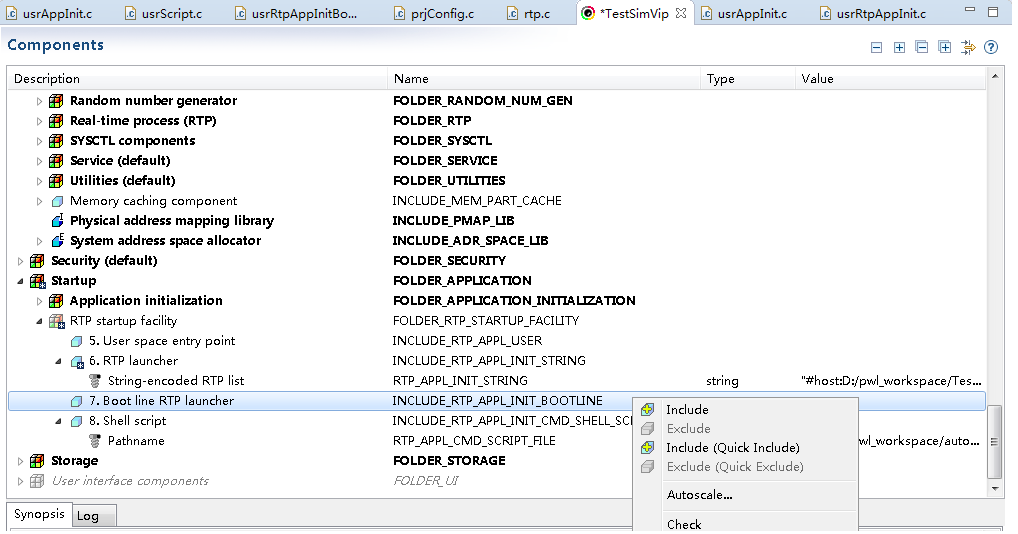
-
vxsim VIP工程的SCRIPT_DEFAULT选项设置:
startup script具体的配置如下:
"host:D:/pwl_workspace/autorun_c.sh#host:D:/pwl_workspace/TestSimRtp.vxe"
需要注意的是startup script中可以配置两种不同的自启动方式,上述的参数可以分成两部分:
(1) “host:D:/pwl_workspace/autorun_c.sh”这部分配置的是vxworks在启动阶段执行一个C Interpreter格式的脚本。autorun_c.sh脚本的具体内容如下:
rtpSp "host:D:/pwl_workspace/TestSimRtp.vxe"
(2)"#host:D:/pwl_workspace/TestSimRtp.vxe"这部分配置的语法和INCLUDE_RTP_APPL_INIT_STRING选项一样。
上述参数分别运行了一次TestSimRtp.vxe,所以TestSimRtp.vxe会被运行两次。
- 启动vxworks simulator,查看运行结果,成功自动运行两次:
Loading symbol table from host:D:/pwl_workspace/TestSimVip/default/vxWorks.sym ...done

// (1) 第一次执行,使用autorun_c.sh脚本的执行
Executing startup script 'host:D:/pwl_workspace/autorun_c.sh'...

rtpSp "host:D:/pwl_workspace/TestSimRtp.vxe"
value = 950476976 = 0x38a720b0
Hello World!
From your RTP application...
By pwl.

Done executing startup script 'host:D:/pwl_workspace/autorun_c.sh'.

// (2) 第二次执行,使用"#host:D:/pwl_workspace/TestSimRtp.vxe"选项配置的执行
-> Spawning RTP: host:D:/pwl_workspace/TestSimRtp.vxe
Hello World!
From your RTP application...
By pwl.
100 ticks
100 ticks
200 ticks
200 ticks
300 ticks
300 ticks
->
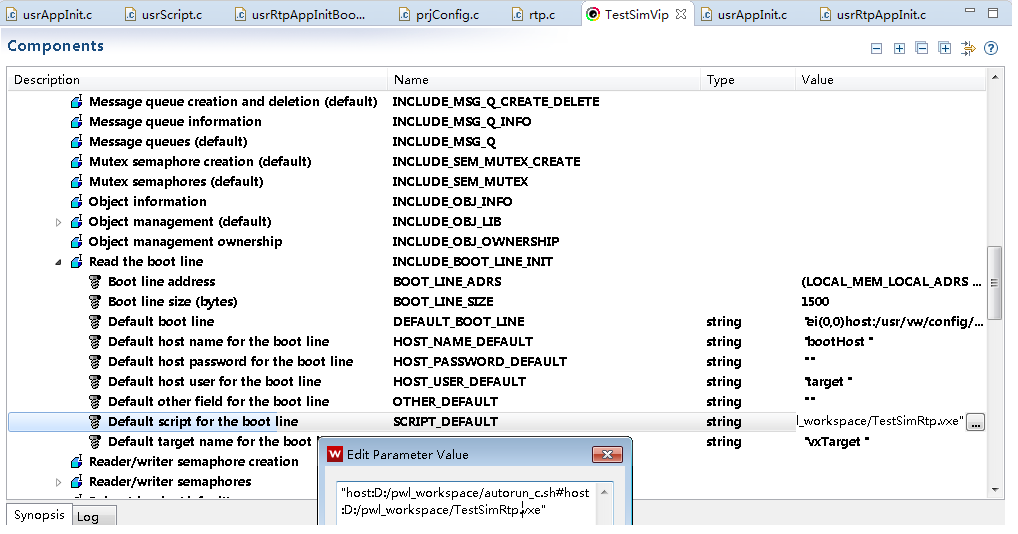
自动执行方式3 (RTP_APPL_INIT_CMD_SHELL_SCRIPT)
- 首先我们在vxsim VIP工程的配置选项中,使能INCLUDE_RTP_APPL_INIT_CMD_SHELL_SCRIPT选项,并配置其中的RTP_APPL_CMD_SCRIPT_FILE参数:
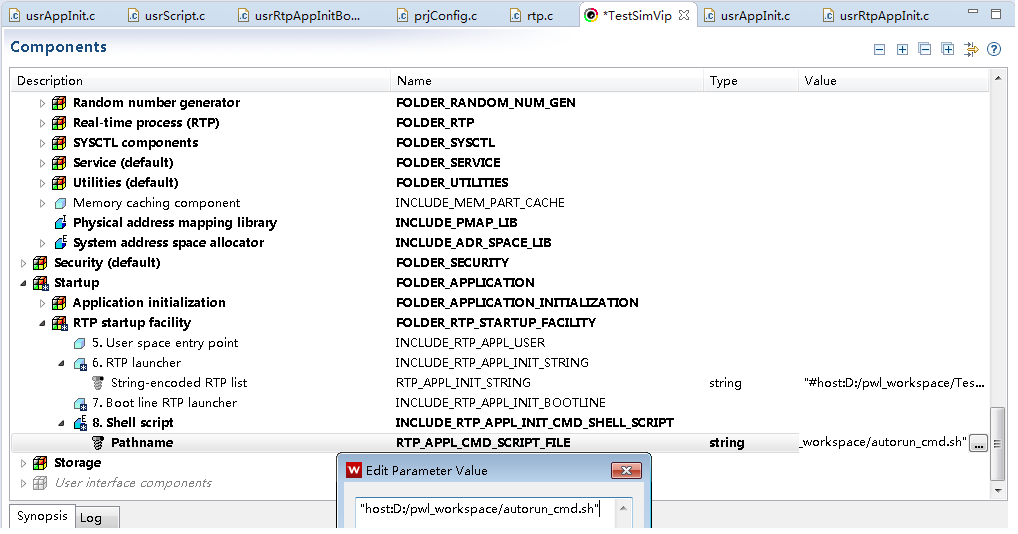
参数的具体内容为:“host:D:/pwl_workspace/autorun_cmd.sh” 系统启动时自动运行配置的Command Interpreter格式的脚本autorun_cmd.sh,autorun_cmd.sh脚本的具体内容为:
rtp exec host:D:/pwl_workspace/TestSimRtp.vxe
- 启动vxworks simulator,查看运行结果,成功自动运行:
-> Executing startup script 'host:D:/pwl_workspace/autorun_cmd.sh'...

rtp exec host:D:/pwl_workspace/TestSimRtp.vxe
Launching process 'host:D:/pwl_workspace/TestSimRtp.vxe' ...
Process 'host:D:/pwl_workspace/TestSimRtp.vxe' (process Id = 0x38d3a890) launched.
Hello World!
From your RTP application...
By pwl.
100 ticks
200 ticks
300 ticks

Done executing startup script 'host:D:/pwl_workspace/autorun_cmd.sh'.

->
自动执行方式4 (RTP_APPL_USER)
- 首先我们在vxsim VIP工程的配置选项中,使能INCLUDE_RTP_APPL_USER选项:
- 在INCLUDE_RTP_APPL_USER选项被使能以后,vxworks启动时会调用usrRtpAppInit.c文件中的usrRtpAppInit()函数。我们可以在此函数中加入自己的rtp启动代码:
void usrRtpAppInit (void)
{
    /* TODO - add your own application launch code here */

    /* (1) 使用代码调用rtpSpawn()函数来运行TestSimRtp.vxe文件 */
	char * vxeName = "host:D:/pwl_workspace/TestSimRtp.vxe";
	char * argv[5];
	RTP_ID rtpId = NULL;
	/* set the application's arguments */
	argv[0] = vxeName;
	argv[1] = NULL;
	argv[2] = NULL;
	argv[3] = NULL;
	argv[4] = NULL;
	/* Spawn the RTP. No environment variables are passed */
	if ((rtpId = rtpSpawn (vxeName, argv, NULL, 220, 0x10000, 0, 0)) == NULL)
	{
		printf ("Impossible to start %s application ", vxeName);
	}

}
- 启动vxworks simulator,查看运行结果,成功自动运行:
-> Hello World!
From your RTP application...
By pwl.
100 ticks
200 ticks
300 ticks

->